I’m back in the mood to work on a mask and decided to finally try my luck at a 2018 Michael Myers mask starting from a TOTS mask I picked up at Spirit Halloween a couple weeks ago. I didn’t take any photos of the “Before” state of the mask, but I think it was pretty typical. Green and brown paint and a lot of heavy brush stokes in the paint that betrayed the sculpt underneath.
I had intended to just paint over the factory paint… but in cleaning up the mask I accidentally peeled some paint off one of the cheeks. Sigh. At that point, I had 2 choices. Just paint over the damage, or go down the rabbit hole of stripping the mask down to raw latex.
I chose poorly, and decided to peel the whole mask working slow and steady with my bare hands and also using a Dremel felt polishing bit to remove some of the stubborn bits (saw this method in a YouTube video). Overall, it went well. But, it was way more labor than I wanted to invest in the mask, but I have to say the results are pretty satisfying. I wouldn’t recommend the effort to anyone. And I certainly understand why anyone selling rehauled masks could not justify the labor.
I also removed the hair at the hairline, enhanced the eye cuts , and trimmed the neck.
Anyway. I plan to post progress updates along the way. Maybe not as many as I have with past projects. But here’s where I stopped today:
Personal preference, but the mouth slit/cut in my copy of the mask bugged me. His jaw felt too slack because of how the mouth drooped. I looked at how the screen used mask(s) look and how the mask looks throughout the movie and I felt that closing the mouth would make a big difference to me.
So, I used some liquid latex and carefully sealed the mouth starting at the middle where the lips already touched. Then I gradually worked my way toward each corner of the mouth. Once the whole mouth was closed, I layered more latex on the seam from inside the mask to reinforce the bond.
I was able to make more progress over the last 2 days. First, I laid down some base colors. I mixed a “Cream” color for the face using Nightshades “Fright White” and “Zombie Flesh (L)” in a 2:1 ratio. And for the back of the neck I used “Decomp”.
Then I sealed the whole mask with Plastidip and let it dry. Next up was a dark wash to pick up all the wrinkles. I used a thinned down acrylic paint with water. The color was a close match to Decomp. I brushed it everywhere and let it dry.
Removed the wash paint from the high points and shaded/contoured the face using reference (Nick Castle’s personal mask is my main ref). I intend to lighten some specific areas with the base color painted on top of this. Then, add the other colors that give it so much character. But I was pretty happy to see the mask come to life at this stage.
Here’s how things look after I my Cream color dry brush pass. I went gradually, building up opacity in passes and used reference to determine how far to go with different areas of the face. On to the next colors!
Then I very sparingly accentuated the rotten areas with the “Ghoul” color. And I added some “Dirt Nap” to areas where there seemed to be a flesh-like warmth:
And finally, I went back with my wash color and a fine tip brush and reworked so many wrinkles and crevices. Some I drew faint, and some darker. I added a hint more blood to the left eye and needle hole using “Redrum”. And wrapped up with lining the eye cut edges with “Black Sabbath”.
I’m happy with the paint at this point, so tomorrow I’ll seal it with matte Plastidip and then see if it needs any Glossifier or not. Then I’ll move to working on the hair.
When you are removing washes are you using rubbing alcohol or baby wipes or water and cloth? Ive used flex seal and noticed when using baby wipes a couple times it affects seal coat. I will switch to plastidip i guess there is a difference? Also , i watched cosplay chrises videos in the kills rehaul he goes over details kinda like finger printing forensics and gets cracks and details with a straight brush but in the ends rehaul video uses techniques like you are using (seals layers and uses washes) the details he got from the kills tutorial were superior in my opinion and he didnt seal layers … (just dry brushed but light work to keep details dark) im wondering if i can still do washes without sealing layers (flex seal seems to add a fuzzy layer to details with washes so maybe i should prolly switch to plastidip if there is a difference) as ive done it before (washes without sealing ) and it seemed to blend alot better . Sorry alot.to digest here im just trying to find the best way to do this as ive failed alot and been disheartened but was successful in alot of things tho too. I think the way chris did the kills mask would save alot of the crack detailing instead of doing everything white and then trying to bring details out with a wash or shoe polish. Not that yours looks bad by any means , it looks absokutely spot on… Food for thought. Keep up the great work and keep giving us all the nitty gritty details its very important and very much appreciated.
Really incredible work. Inspiring and very insightful with details. Please indulge me with brushes you are using too. You are doing a really professional job. much respect to the process you are bestowing upon us .
I’m using small cut up pieces of bed sheet dipped in water to remove the acrylic wash. I like to seal the base colors with Plastidip before the wash pass just to ensure that I have less of a chance of rubbing those colors off as I work.
I think a piece of advice I would give, is that it’s ok to fail. I don’t like any of my prior 1978 rehauls. I worked hard on them, and learned a lot from each, but ultimately am not happy with how they turned out. I think this mask is better (I know it’s very different) because I’ve also learned about some pros/cons of different techniques and materials. So you’re not alone in how you feel.
As far as brushes, I laid down the base colors with one of my airbrushes - an Iwata HP-M2 single action. For the wash and dry brushing I used a cheap medium sized flat edged brush. And for detailing with the other colors, I used 2 different fine tipped brushes. I took a photo of my tools for this mask:
Thank you for the kind words. Just being clear, not my first mask or paint work by any means… hehe. Been doing this kind of work for decades and happy to share/help others
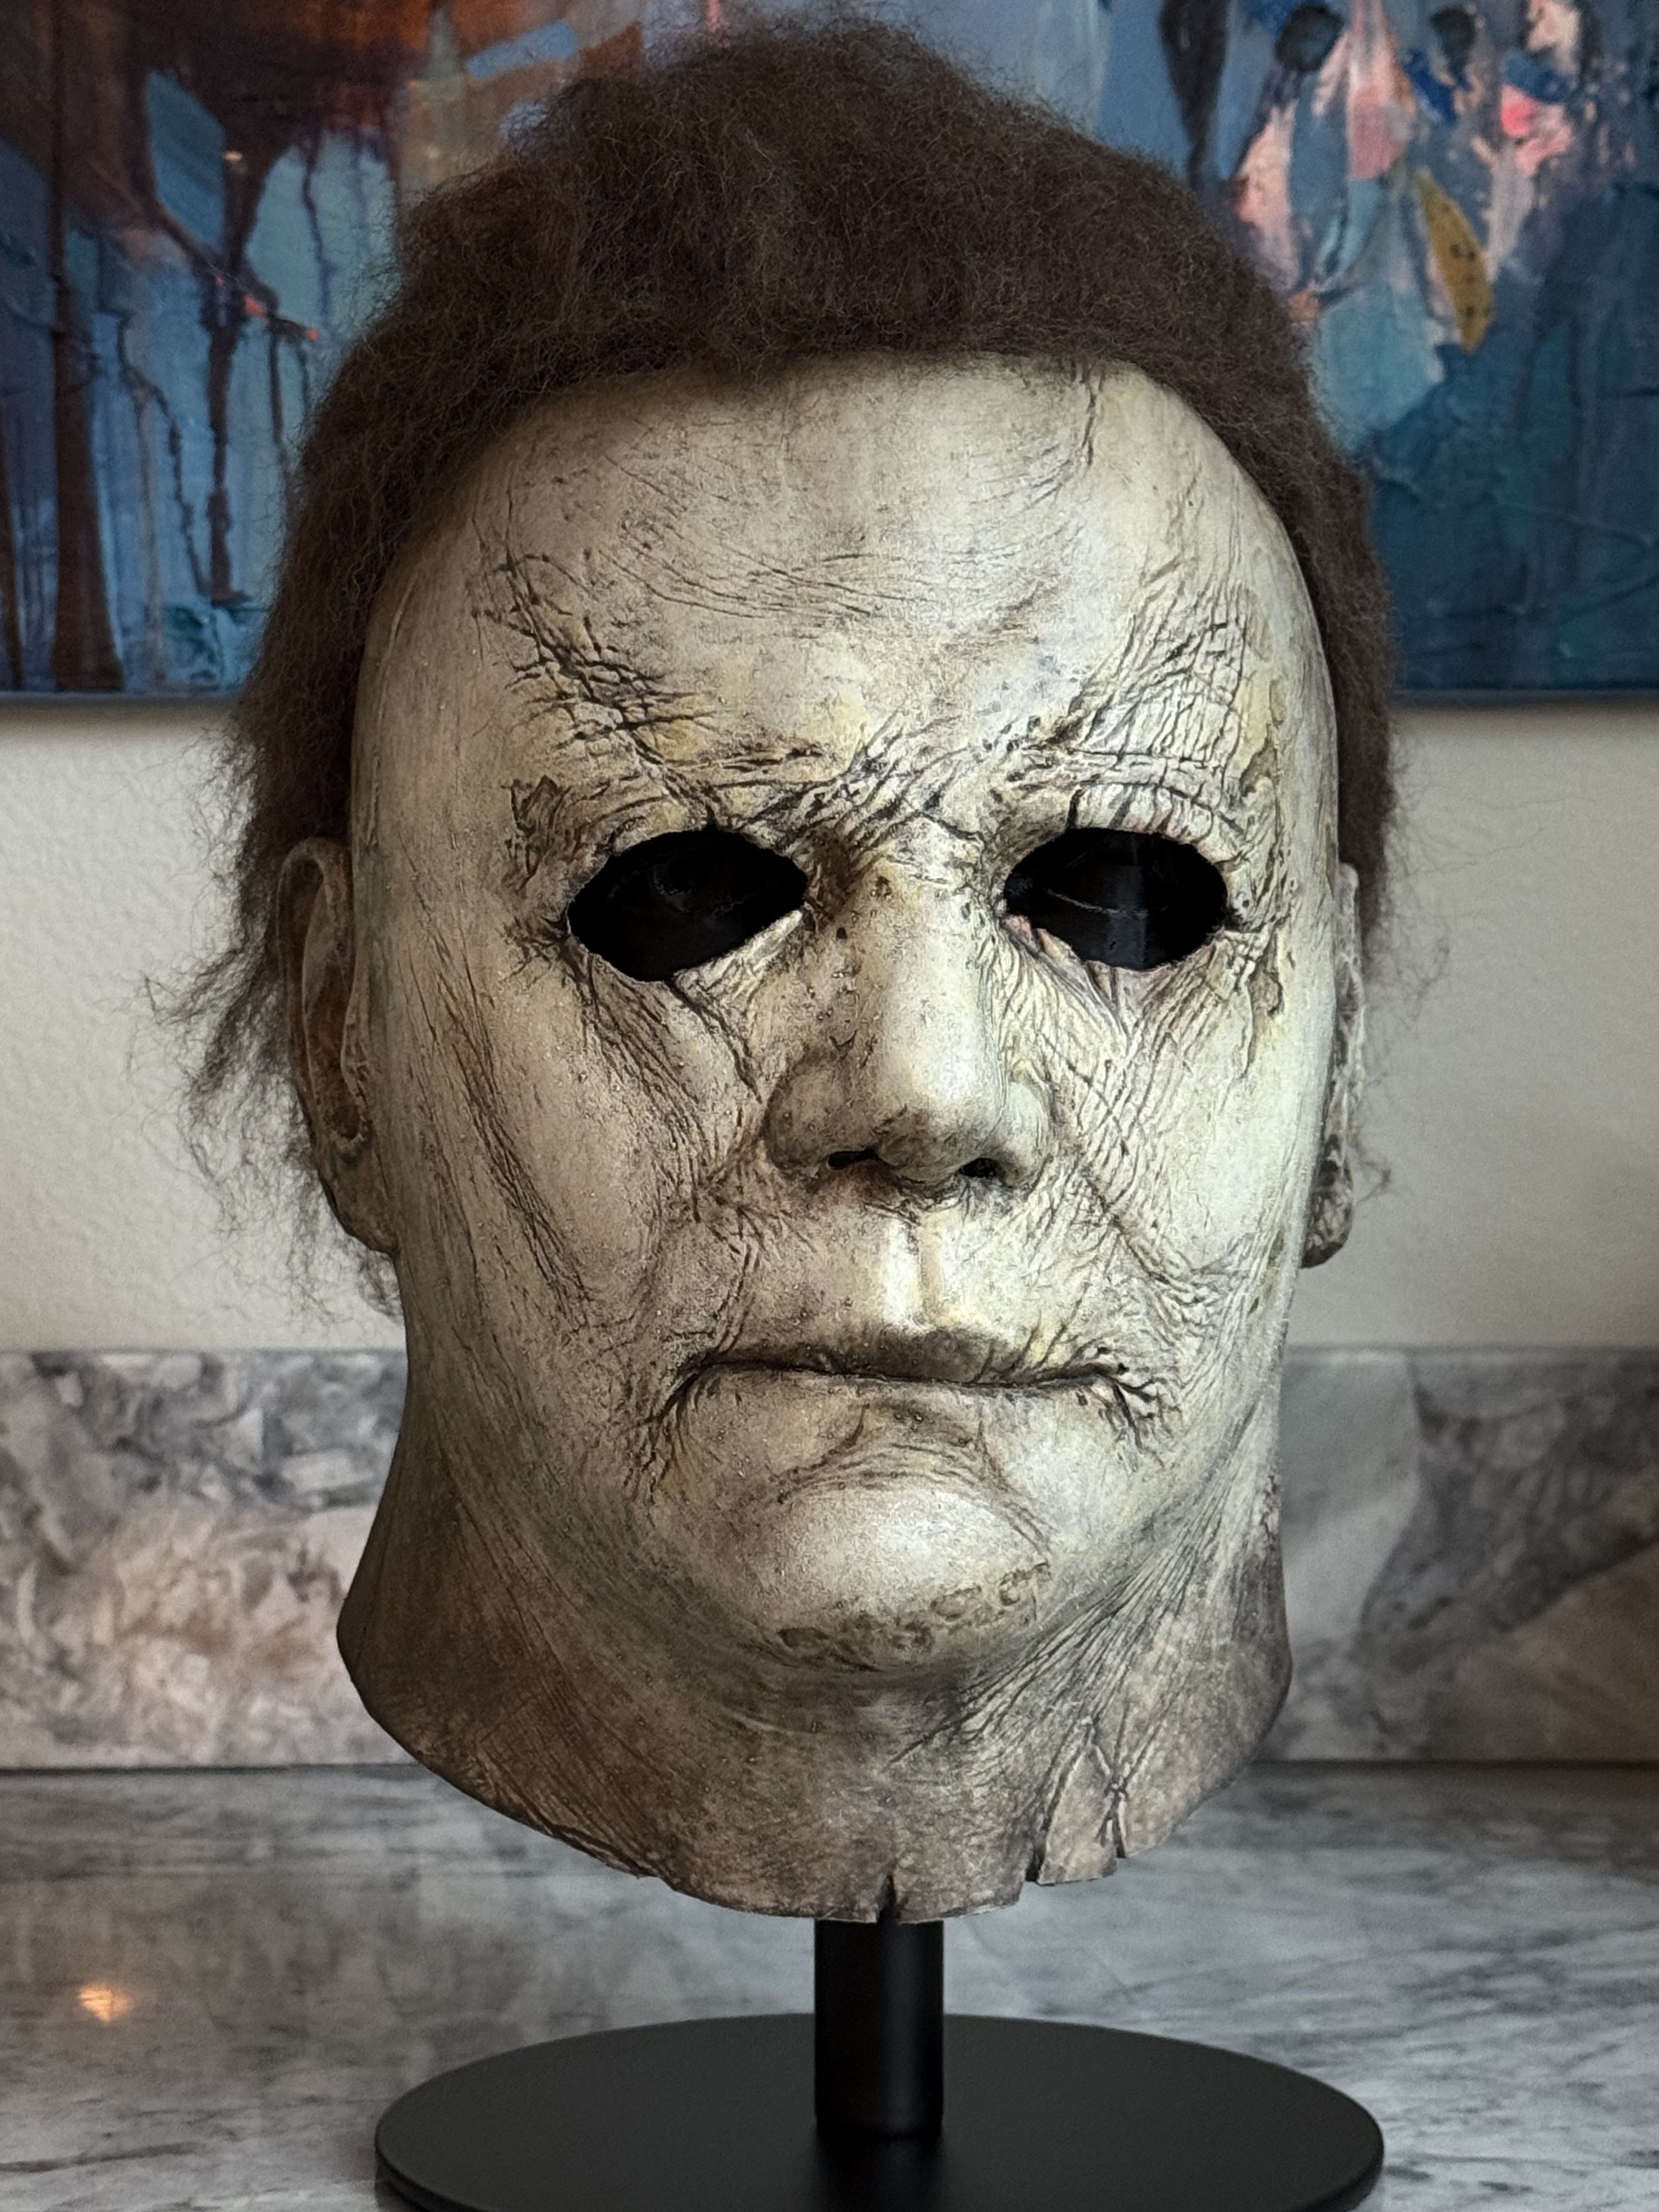
I think I’m in the home stretch now. Yesterday I applied 2 light coats of matte Plastidip to the mask to fully seal the paint job. Then I misted some of the Plastidip Glossifier on it in light passes and kept bringing the mask into different lighting conditions to see if I could find that on-screen satin sheen that mask appears to have. I like where I stopped with that.
This morning, I prepped the mask for hair by using some Barge contact cement on the hair line:
Then I prepped all the original hair I had removed by trimming off most of the original glue and brushing on a new edge of contact cement. I waited 10-15 minutes for that stuff to cure and then began reattaching the hairline. I messed with the hair and picked at the hairline to try and get that fuzzed transition from the face to the hair that the real masks have. And I just wanted to get the overall shape/volume of the hair in a good spot for I do the final styling with any “product” or matte clear coat to lock it in:
Working on the hair always drives me nuts on myers masks. But I’m happy with how it’s looking so far. The hair seems to change from scene to scene in the movie, and seeing the surviving screen used masks as the look today really gives you a lot of options. This to me is kinda a blend of looks. We’ll see where it goes.
You nailed it . Incredible. And i know what you mean with the hair. But i think thats the briliance of calling him the Shape and constantly changing the look through subtle things in the films… thanks for all the insight too really appreciated
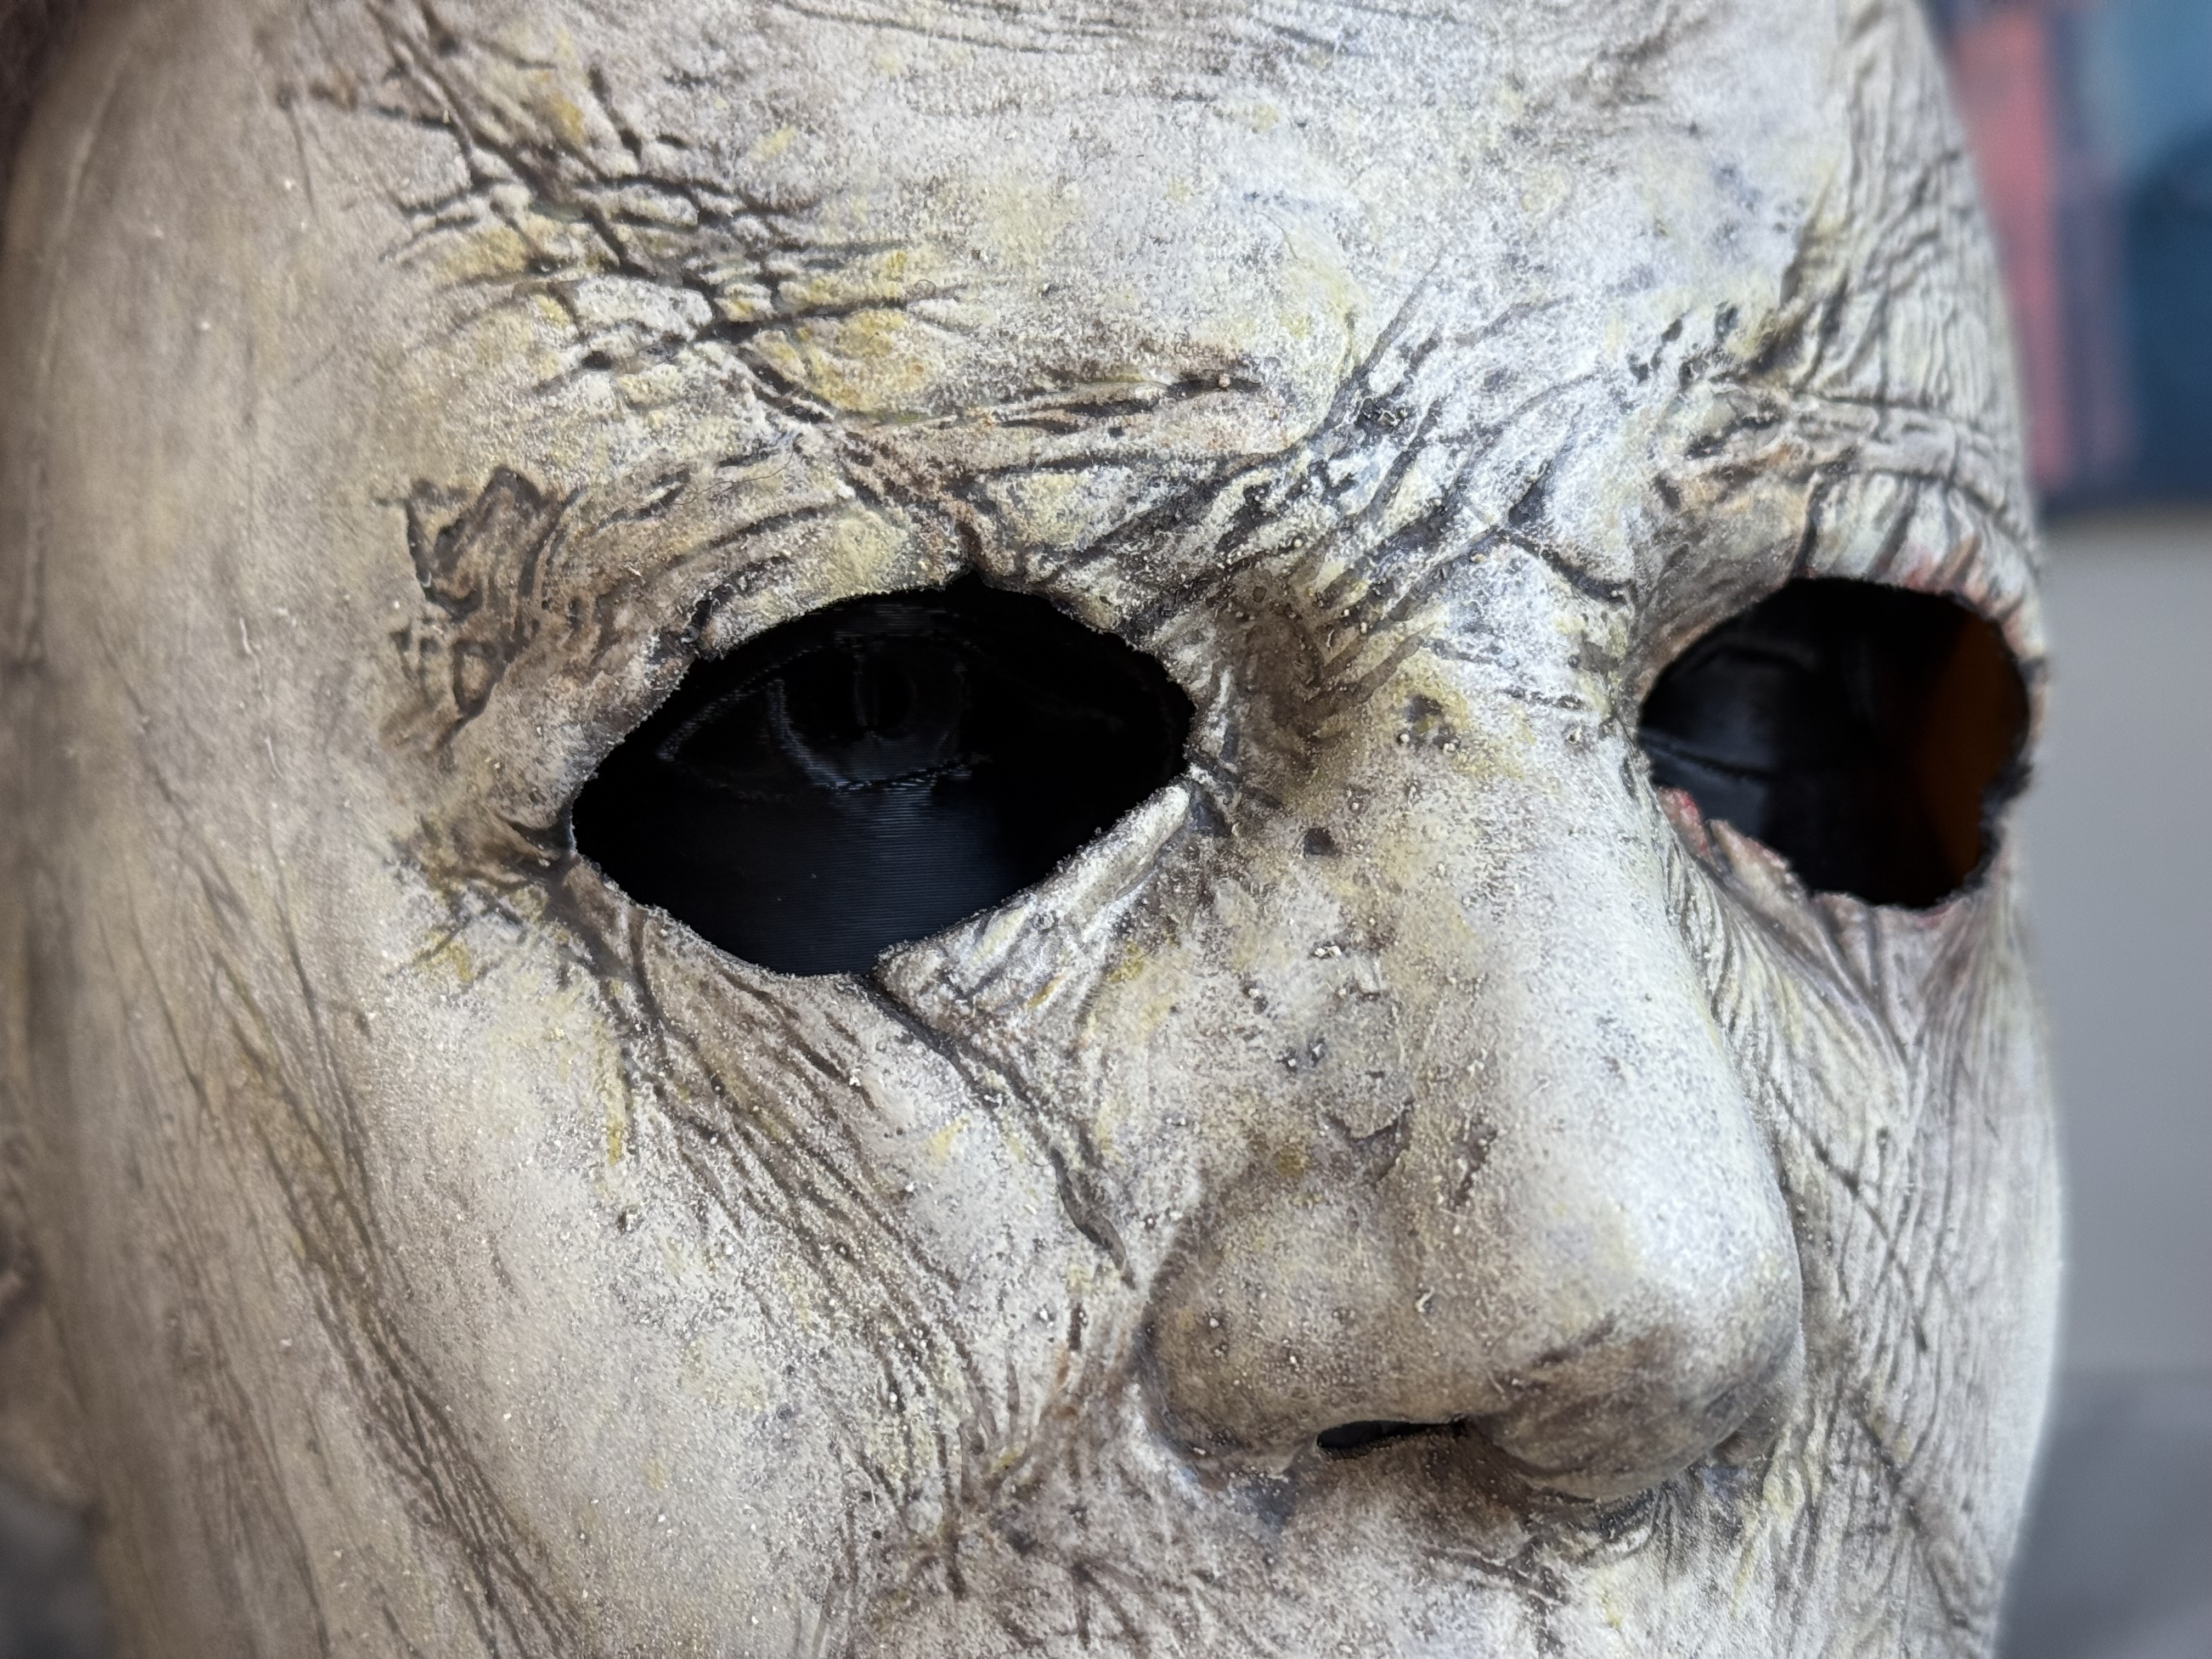
Thanks. I got some of the same hairspray “supposedly” used by Christopher Nelson on the movie masks and I hope to wrap up the finishing touches this week. In the meantime, I’ve been working on my own version of some eye inserts. I guess I can show some of that work here.
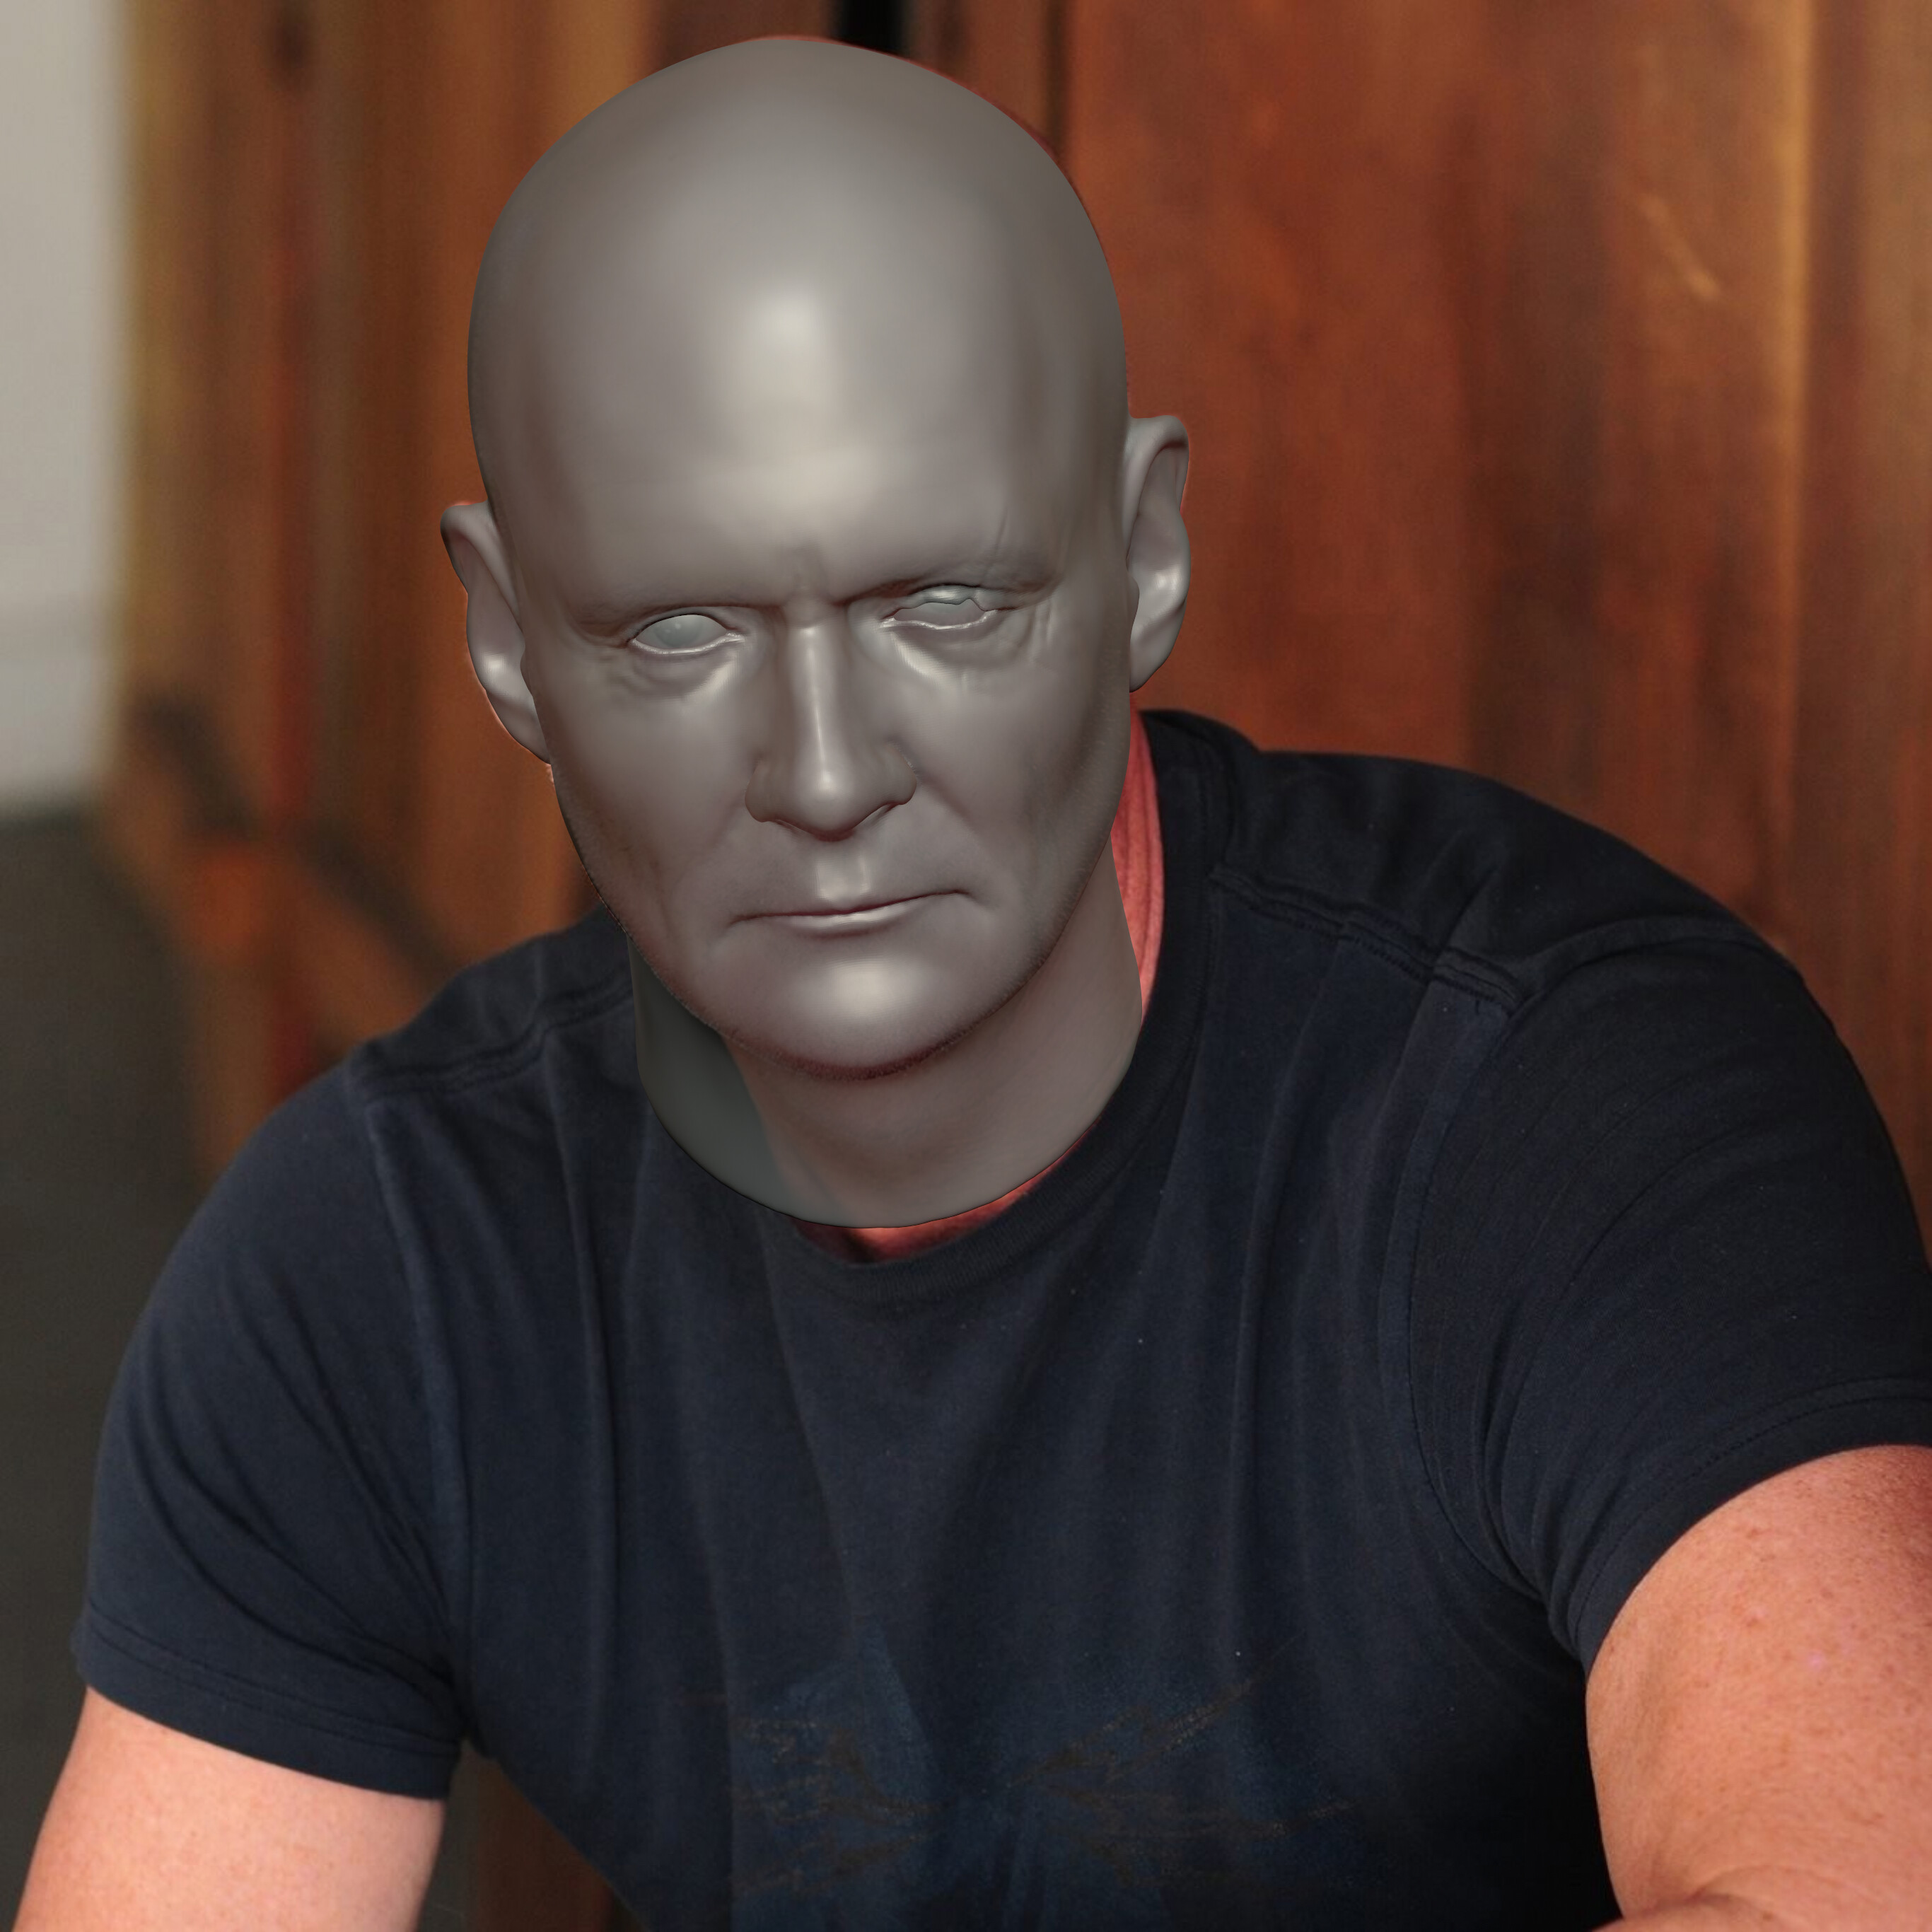
I’ve been sculpting a James Jude Courtney likeness to try and get a head that more accurately reflects his eyes (I may have another use for the sculpt in the future that I’m not ready to discuss). Here’s a look at it overlaid on a photo of JJC when I had it in a pretty good place:
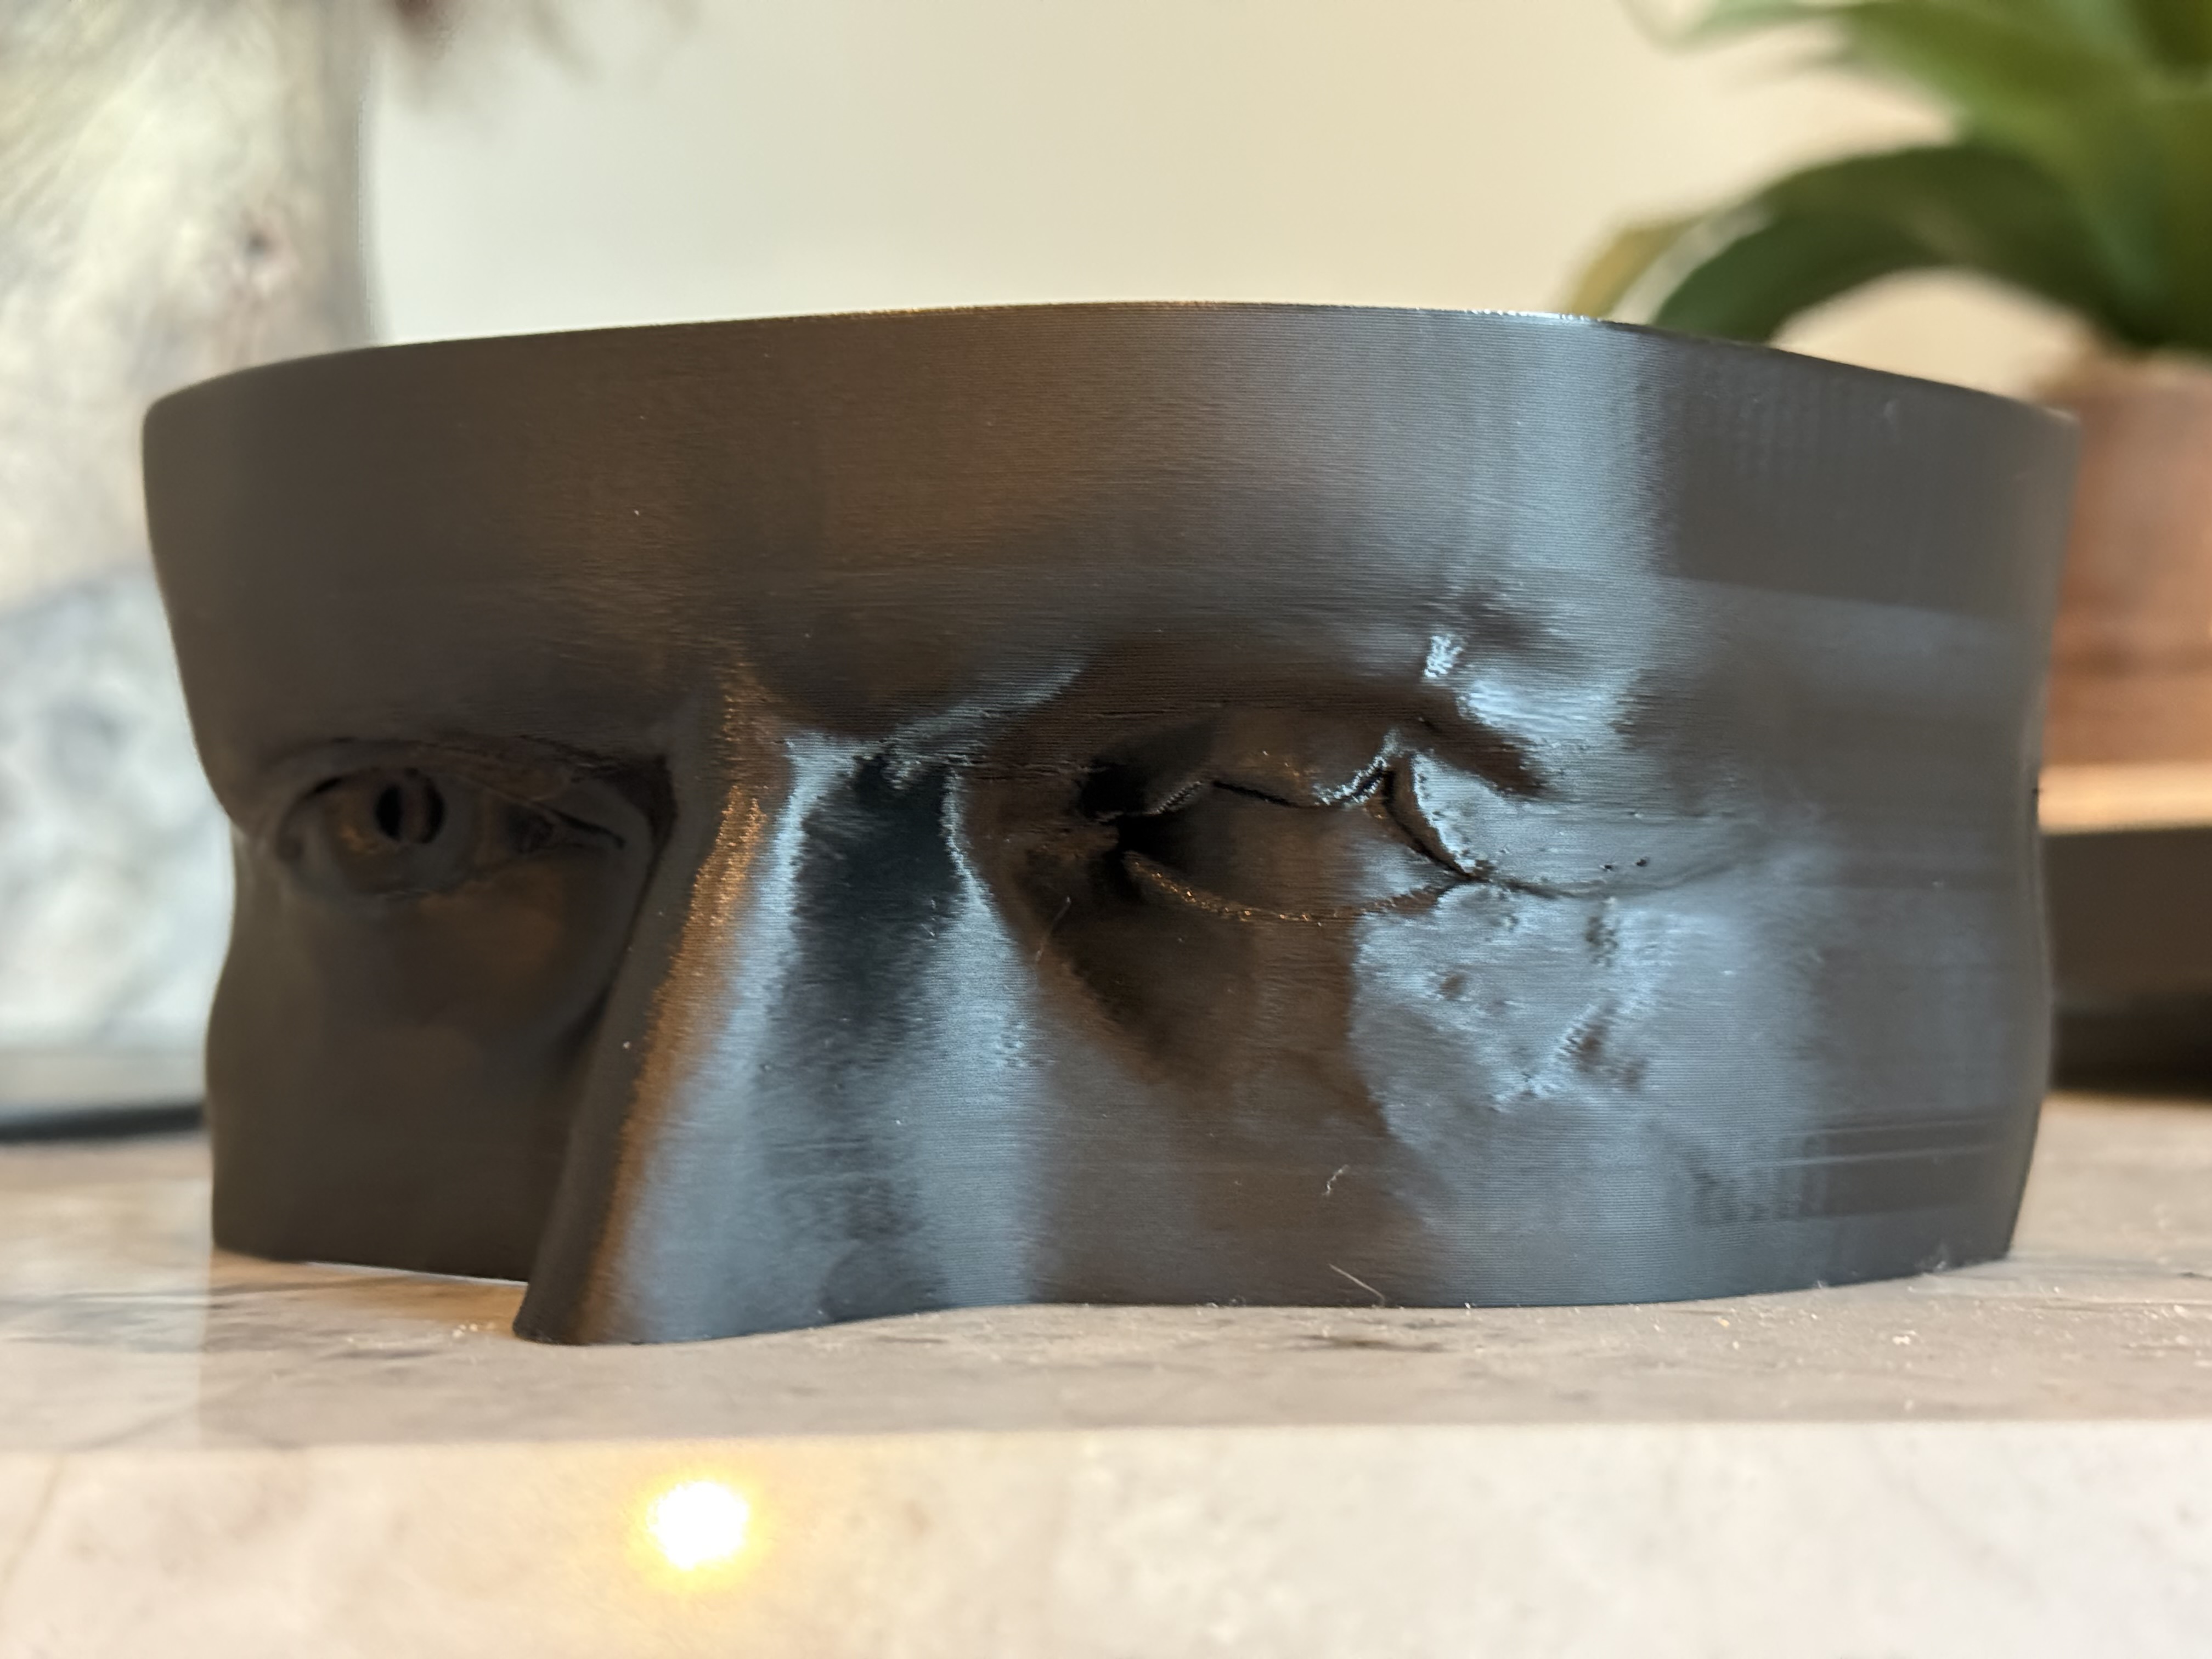
From this, I isolated the area around his eyes and did a draft 3D print (filament printer for the test print). I was looking to get the size dialed in knowing it’s designed with 28mm eyes from Fourth Seal Studios in mind:
And it fits the mask really well in my opinion. I positioned it such that the eyes are higher up in the eye cuts as we see throughout the film. It even seems to give the mask a subtle JJC looking stretch around the forehead, and cheeks:
I’m deciding what material I want to work in for the final piece (silicone, translucent resin, etc.) and then I’ll sculpt in the final details and skin texture before moving to print a master using my resin printer.
Funny enough, I do really like the way the simple black printed version looks and gives a hint of someone in the mask. At the very least, I think it looks better than the black plastic bag I had stuffed in the front of the face to get the dark eye look Maybe that’s something I could offer as a cheaper alternative if there’s interest. Still figuring it out though.